How to measure ring size accurately at home? It’s a question that plagues many, whether you’re buying a ring online, surprising someone special, or just curious about your size. Getting it wrong can lead to a ring that’s too tight (ouch!), too loose (bye-bye ring!), or just plain uncomfortable. This guide breaks down foolproof methods to get the perfect fit from the comfort of your own home, so you can skip the awkward jewelry store visits and confidently order that perfect piece.
We’ll cover several techniques – from using simple household items like string and paper to utilizing more specialized tools. We’ll explore the pros and cons of each method, highlighting potential pitfalls and offering tips for maximum accuracy. By the end, you’ll be a ring-sizing pro, ready to conquer any online purchase or gift-giving mission.
Accurate Ring Sizing at Home
Getting your ring size right is super important, way more than you might think! An ill-fitting ring can be uncomfortable, even painful. It might feel too tight, cutting off circulation or causing discomfort, or too loose, leading to it constantly spinning around your finger or even getting lost. Accurate sizing ensures a perfect fit, maximizing comfort and preventing potential problems.A poorly sized ring can lead to more than just discomfort.
A ring that’s too tight could restrict blood flow, potentially causing swelling or even nerve damage. On the other hand, a ring that’s too loose is easily lost or could get caught on clothing or objects, leading to damage or even injury. Investing a little time in accurate sizing saves you from potential headaches (and maybe even a lost heirloom!).
Creating a Suitable Measuring Environment
A calm and organized workspace is key for accurate ring sizing. You need a clear, flat surface free from distractions. Good lighting is also crucial to ensure you can clearly see the measuring tools and your finger. Having all your materials readily available—ruler, string, tape measure—before you start will make the process smoother and less frustrating. Avoid measuring in a rush or when your fingers are swollen (like after a workout or on a hot day).
A comfortable room temperature is also beneficial to avoid any finger swelling that might skew your measurements.
Methods for Measuring Ring Size
Accurately measuring your ring size at home can save you time and potential frustration. While several methods exist, the string method offers a simple and accessible approach, requiring minimal materials. This section details the string method, highlighting its advantages and potential pitfalls.
String Method for Ring Size Measurement
The string method relies on using a piece of string to trace the circumference of your finger where you’ll wear the ring. This measurement is then transferred to a ruler to determine your ring size. This method is inexpensive and readily adaptable, making it a popular choice for DIY ring sizing.You’ll need a piece of string (about 12 inches long), a pen or marker, a ruler, and a ring that fits comfortably on the finger you’re measuring (optional, but helpful for accuracy).To measure accurately using the string method, wrap the string snugly around the base of the finger where you intend to wear the ring.
Ensure the string isn’t too tight or too loose; it should rest comfortably without any gaps. Mark the point where the string overlaps, using your pen or marker. Carefully remove the string and lay it straight against a ruler. Measure the length of the string from the beginning to the mark you made. This measurement represents the circumference of your finger.
Convert this circumference measurement to your ring size using a ring size chart (readily available online).Potential sources of error in this method include inconsistent string tension, inaccurate marking of the string, and misreading the ruler. To minimize these errors, use a non-stretchy string (like cotton or embroidery floss), make sure the string is wrapped smoothly around your finger, and use a ruler with clear markings.
Repeat the measurement several times to ensure consistency and average your results for the most accurate reading.
| Step | Action | Measurement | Note |
|---|---|---|---|
| 1 | Wrap string snugly around finger base. | N/A | Ensure a comfortable, even fit. |
| 2 | Mark the point where the string overlaps. | N/A | Use a pen or marker to create a clear mark. |
| 3 | Lay the string against a ruler. | Measure string length from beginning to mark (in inches or millimeters). | Ensure the string is straight and taut. |
| 4 | Record the measurement. | Circumference of finger (inches or millimeters). | Repeat steps 1-3 at least twice for accuracy. |
| 5 | Consult a ring size chart. | Ring size. | Convert the measured circumference to the corresponding ring size. |
Methods for Measuring Ring Size
Accurately measuring your ring size at home can be tricky, but using a ring sizing tool offers a relatively straightforward and reliable method. These tools provide a standardized way to determine your ring size, minimizing the guesswork and potential for errors associated with other methods. Let’s explore the various types available and how to use them effectively.
Ring Sizing Tools: Types and Usage
Commercially available ring sizing tools come in a variety of forms, each with its own strengths and weaknesses. The most common types include plastic or metal mandrels, and ring sizers that use a gauge system. Plastic mandrels are usually inexpensive and easy to find online or at craft stores. Metal mandrels tend to be more durable and offer a slightly more precise measurement.
Ring sizers, often featuring a series of numbered rings, provide a visual comparison for direct size determination.
Advantages and Disadvantages of Ring Sizing Tools
Using a ring sizing tool offers several advantages. They provide a consistent and objective measurement, reducing the chance of human error. They are generally easy to use, requiring minimal skill or expertise. Furthermore, the cost is typically low, making them an accessible option for anyone needing to determine their ring size.
However, there are also some disadvantages to consider. The accuracy depends on the quality of the tool itself. A poorly made or damaged tool can lead to inaccurate measurements. Also, some tools may not accommodate all ring styles or sizes, particularly unusually shaped or sized rings. Finally, it’s important to remember that ring sizing tools measure the
-inner diameter* of the ring; this is different from the ring size that is often printed on the ring itself (which is a circumference measurement).
Using a Ring Sizing Tool: A Visual Guide
Imagine a ring sizing mandrel, a long, cylindrical tool with a series of graduated rings of increasing sizes. Each ring is clearly marked with its corresponding ring size. To use it, carefully slide your ring onto the mandrel, starting from the smallest size. Gently move the ring along the mandrel until you find the ring that fits snugly but not too tightly.
The number marked on that ring represents your ring size. For ring sizers with individual rings, you simply try each ring until you find the one that is the most comfortable fit. It’s crucial to ensure that the ring slides smoothly onto the mandrel or into the ring sizer. If it feels forced or difficult, this may indicate that the ring is too small for the mandrel’s hole or ring sizer.
Remember to use a ring that is similar in style and material to the one you are planning to purchase. A wide band will measure differently than a thin band, and the metal will also affect the fit.
Methods for Measuring Ring Size
Determining your ring size at home can be surprisingly easy, especially if you already have a ring that fits well. This method relies on using a ring you already own as a template to determine its size, which can then be used to order a new ring. While simple, it’s crucial to be precise to avoid sizing errors.
Existing Ring Method
This method involves tracing your existing ring onto paper and then measuring the resulting circle’s diameter. This diameter, in millimeters or inches, can then be converted to a standard ring size using a ring size chart (easily found online). However, accuracy depends heavily on the precision of your tracing and measurement. Slight inaccuracies in tracing or measuring can lead to a ring that’s either too tight or too loose.
The following steps provide a detailed guide for measuring ring size using an existing ring:
- Gather your materials: You’ll need a ring that fits comfortably, a piece of paper, a pen or pencil, a ruler (preferably one with millimeter markings), and a ring size chart.
- Trace the ring: Place the ring on the paper and carefully trace around its outer edge with a pen or pencil. Make sure the pen is held perpendicular to the paper to get an accurate tracing.
- Measure the diameter: Once you’ve traced the ring, carefully measure the diameter of the circle you’ve drawn. The diameter is the distance across the circle, passing through the center. Measure several times from different angles to ensure accuracy. Record your measurement in millimeters.
- Convert to ring size: Use a ring size chart to convert your diameter measurement into a standard ring size. Ring size charts vary slightly depending on the country and jeweler, so it’s best to use a chart from the jeweler you plan to purchase your ring from.
- Double-check your work: Repeat steps 2-4 to ensure consistency in your measurements. Discrepancies could indicate inaccuracies in tracing or measuring.
Potential challenges with this method include:
- Inaccurate tracing: A shaky hand or uneven pressure on the pen can result in an inaccurate tracing, leading to an incorrect ring size measurement.
- Measurement errors: Incorrectly measuring the diameter, even by a small amount, can significantly impact the final ring size.
- Ring shape: This method works best for rings with a perfectly round shape. Oval or other irregularly shaped rings may require more advanced techniques for accurate sizing.
- Ring material: Thick or unusually shaped ring bands may make accurate tracing difficult.
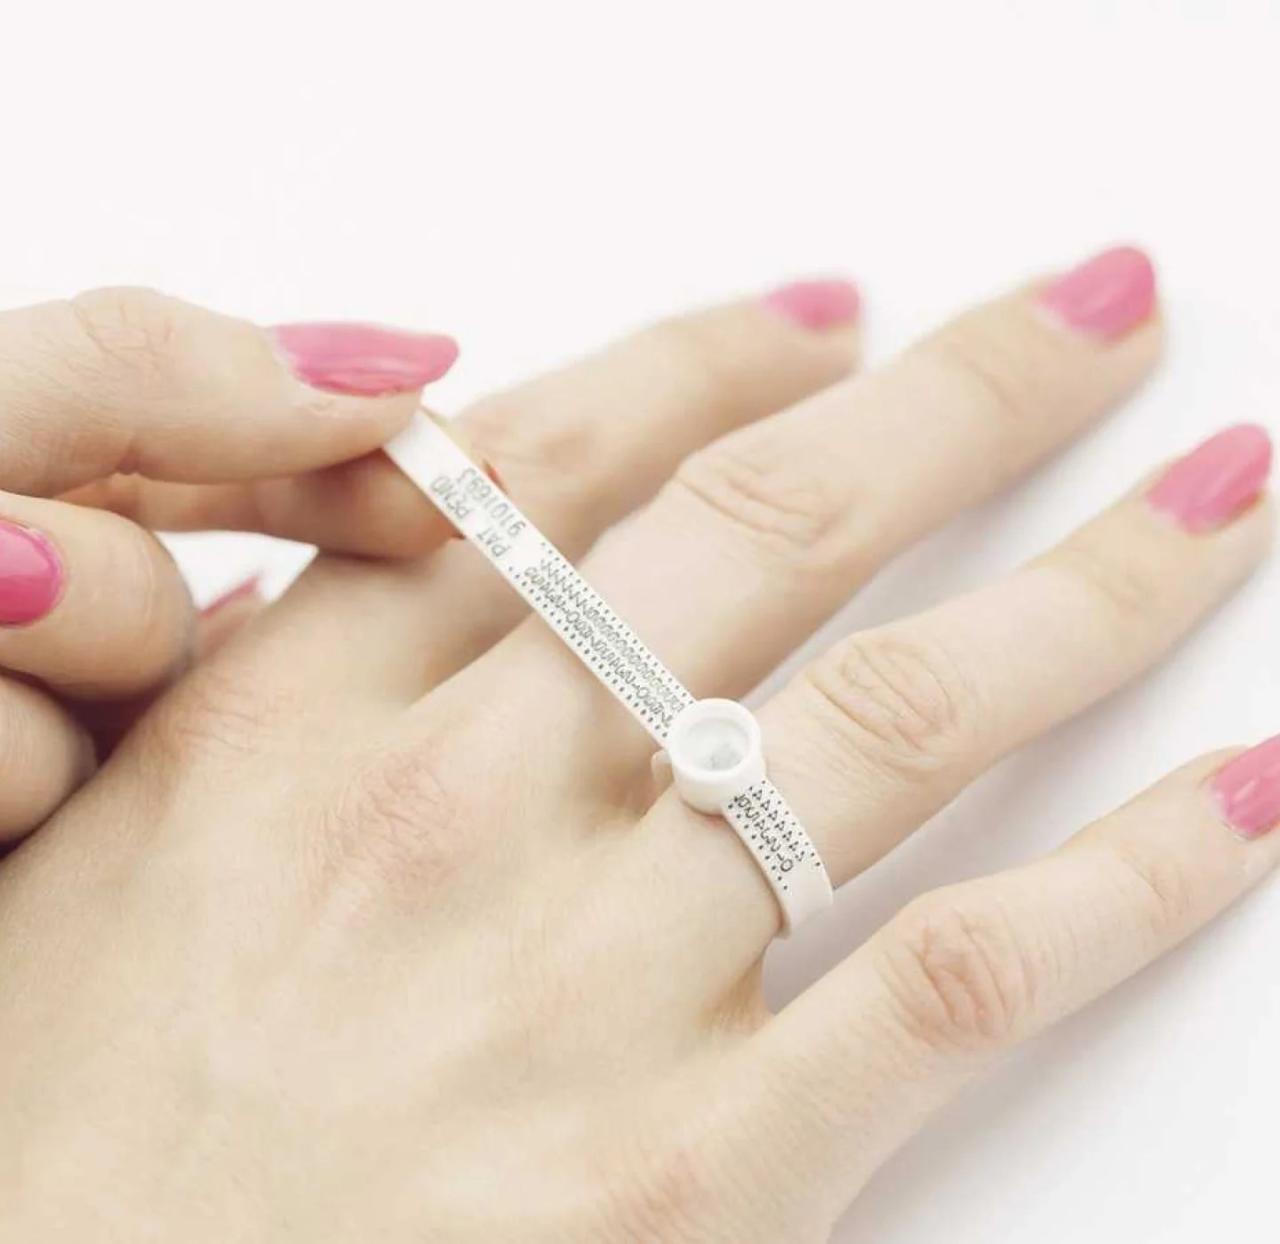
Methods for Measuring Ring Size

Accurately measuring your ring size at home can be tricky, but with the right method, you can get a pretty close estimate. Several techniques exist, each with its own advantages and limitations. We’ll explore one popular and readily accessible method: the paper method.
Paper Method for Ring Size Measurement
The paper method offers a simple, low-cost way to estimate your ring size. It requires minimal materials and can be done quickly. However, its accuracy is less precise than professional methods, so it’s best used as a preliminary measurement before purchasing expensive jewelry.The accuracy of this method relies heavily on how carefully you execute each step. A slightly loose or tight wrap around your finger can significantly impact the final measurement.
- Gather Materials: You’ll need a thin strip of paper (like printer paper or a thin ribbon), a pen or pencil, and a ruler. Avoid using thick cardstock or materials that might stretch or compress easily.
- Wrap the Paper: Wrap the paper strip snugly around the base of the finger you’ll be wearing the ring on. Make sure it’s comfortable but not too tight; you want to simulate how a ring would fit. Ensure the paper is completely flat against your finger, without any gaps or overlapping at this stage.
- Mark the Overlap: Carefully mark the point where the paper overlaps. Use a pen or pencil to make a clear and precise mark. Be sure to make the mark on the inside of the paper, so it’s on the side that’s touching your finger.
- Measure the Length: Unwrap the paper and measure the distance from the beginning of the paper strip to the mark you made. Use a ruler to get an accurate measurement in millimeters or inches.
- Convert to Ring Size: Use a ring size chart to convert the measured length to your ring size. Many charts are available online. Remember, this conversion will vary slightly depending on the chart you use and the finger you are measuring. These charts often have conversion tables for both metric and imperial units. For example, a measurement of 57mm might correspond to a size 7, but it’s crucial to check multiple charts for consistency.
Limitations of the Paper Method
While convenient, the paper method isn’t perfect. The accuracy depends on several factors: the type of paper used, how tightly you wrap the paper, and the accuracy of your measurement. It’s prone to errors stemming from inconsistent wrapping techniques. The method is more suitable for providing a rough estimate rather than a precise ring size. For high-value jewelry purchases, it’s recommended to get your ring size professionally measured by a jeweler to avoid sizing issues.
Comparing Measurement Methods
So, you’ve learned a few ways to measure your ring size at home. But which method is best? The answer, as with most things, depends on your situation and what resources you have available. Let’s break down the pros and cons of each method to help you choose the most accurate and convenient option for you.
Accuracy and ease of use vary significantly across the different methods. While some offer a quick and relatively accurate result, others require more precision and attention to detail. Understanding these differences will help you select the best approach and minimize potential errors.
String Method Accuracy and Ease of Use
The string method, while simple, is prone to errors. Accuracy depends heavily on how tightly you wrap the string and how accurately you measure the resulting length. A slightly loose or tight wrap can significantly alter the final measurement. Ease of use is high, making it accessible to everyone. However, converting string length to ring size requires a conversion chart, adding an extra step and another potential source of error.
Improper measurement of the string itself is a common mistake. Using a flexible but not stretchy string, measuring carefully, and double-checking the measurement are key to improving accuracy.
Ring Sizing Tool Accuracy and Ease of Use
Ring sizing tools offer a more precise and convenient method than the string method. They provide a direct measurement, eliminating the need for conversions. Accuracy is generally higher, assuming the tool is calibrated correctly. Ease of use is also good, as long as you have a tool. Potential errors can arise from a faulty or poorly calibrated tool, or from improper use of the tool.
Regularly checking the calibration of your ring sizing tool is crucial.
Existing Ring Method Accuracy and Ease of Use
Using an existing ring as a template is straightforward and generally quite accurate if the ring fits well and you have access to a reliable ring sizer or jeweler. The ease of use is high, but this method is only feasible if you have a ring that fits properly. Potential errors arise from using a ring that doesn’t fit perfectly, or from using an inaccurate sizing tool or method at the jeweler.
Selecting a ring that is a true representation of your desired fit is vital for this method’s accuracy.
Paper Method Accuracy and Ease of Use
The paper method, similar to the string method, is relatively easy to use but less accurate. The precision relies heavily on accurately tracing the ring and measuring the resulting circle. Variations in tracing technique, paper thickness, and measurement can lead to errors. Ease of use is moderate; it’s simpler than the string method but requires a bit more precision in tracing and measuring.
Using a stiff paper, a sharp pencil, and a precise ruler can significantly reduce errors.
Comparison Table
| Method | Accuracy | Ease of Use | Pros/Cons |
|---|---|---|---|
| String | Low to Moderate | High | Simple, inexpensive; prone to measurement errors, requires conversion chart. |
| Ring Sizing Tool | High | Moderate | Precise, convenient; requires purchasing a tool, potential for tool malfunction. |
| Existing Ring | Moderate to High | High | Simple, accurate if ring fits well; requires an existing ring, relies on jeweler’s accuracy. |
| Paper | Low to Moderate | Moderate | Simple, inexpensive; prone to tracing and measurement errors. |
Understanding Ring Size Charts
Ring size charts are essential tools for accurately determining your ring size, especially when using at-home measurement methods. Understanding how to interpret these charts is crucial for getting the perfect fit. They provide a standardized way to convert your measurements (usually finger circumference or diameter) into a corresponding ring size.Ring size charts typically present ring sizes in numerical format, often ranging from sizes 3 to 13, with half sizes included (e.g., 6.5, 7.5, etc.).
However, it’s important to note that these numbers aren’t universally consistent across all countries or jewelry makers. Some charts might use a different numbering system, so always check the specific chart’s key or legend.
Different Ring Size Chart Variations
Different ring size charts exist, reflecting variations in measurement units and sizing standards. Some charts list ring sizes based on the inner diameter of the ring in millimeters, while others use the circumference of the finger in millimeters or inches. Additionally, some charts might cater specifically to certain ring styles or materials. For instance, a chart designed for wide bands might differ slightly from one designed for thinner bands due to variations in how the ring sits on the finger.
It is vital to select a chart that aligns with the measurement method used and the type of ring being purchased.
Finger Circumference Versus Diameter
It’s critical to understand the difference between measuring finger circumference and diameter. Finger circumference refers to the measurement around your finger, while diameter is the measurement across your finger. Many charts use circumference, as it’s a more accurate reflection of how a ring will fit. Using the wrong measurement method can lead to an inaccurate ring size.
For example, using a diameter measurement on a chart that requires circumference will result in a ring that is either too large or too small.
Sample Ring Size Chart
A typical ring size chart might look like this: Size 3 corresponds to approximately 41.1 mm of circumference, Size 4 is approximately 42.2 mm, Size 5 is approximately 43.3 mm, Size 6 is approximately 44.4 mm, Size 7 is approximately 45.5 mm, Size 8 is approximately 46.6 mm, Size 9 is approximately 47.7 mm, Size 10 is approximately 48.8 mm, Size 11 is approximately 49.9 mm, and Size 12 is approximately 51.0 mm.
Remember that these are approximate values and may vary slightly depending on the specific chart and measurement system used. It is always best to check the chart’s key for specific details.
Troubleshooting and Tips for Accuracy: How To Measure Ring Size Accurately At Home
Getting the perfect ring size at home can be tricky, even with the best methods. Small errors in technique can lead to significant discrepancies, resulting in a ring that’s either too tight or too loose. This section will address common pitfalls and offer solutions for achieving the most precise measurement possible.Common mistakes often stem from inconsistent measuring techniques, using the wrong tools, or failing to account for factors like finger swelling.
By understanding these issues and implementing the tips below, you can dramatically improve the accuracy of your at-home ring sizing.
Common Measurement Errors, How to measure ring size accurately at home
Inaccurate ring sizing at home frequently arises from simple mistakes. For instance, using a string that’s too thick or too thin will skew the measurement. Similarly, not ensuring the string is snug but not overly tight around the finger can lead to inaccurate circumference readings. Finally, measuring at the wrong time of day – when fingers are swollen from heat or activity – will produce a larger-than-usual size.
Resolving Measurement Inconsistencies
If you obtain different measurements using various methods, it’s crucial to identify the source of the discrepancy. First, re-check your technique. Ensure you’re using a flexible, thin measuring tool (like dental floss or thin string) and that you’re measuring the finger at the base of the knuckle. If inconsistencies persist, try measuring several times using the same method and averaging the results.
This helps minimize random errors. If the differences remain significant, consider using a different method entirely (e.g., using a ring sizer tool instead of string).
Tips for Achieving Accurate Ring Size Measurement
Several strategies can significantly improve the accuracy of your measurements. First, measure your finger at the same time of day, ideally in the evening when your fingers are likely to be slightly swollen, accounting for daily fluctuations. Second, ensure the measuring tool is snug but not constricting. You should be able to comfortably slide the string or ring sizer on and off.
Third, use a ruler or a tape measure with clear, fine markings to accurately read the length or circumference. Finally, consider having a friend or family member assist you with the measurement to ensure a consistent and even application of the measuring tool. Repeating the process multiple times and averaging the results further enhances accuracy.
Accounting for Finger Size Variations
Finger size fluctuates throughout the day due to temperature changes, fluid retention, and physical activity. To minimize the impact of these variations, it’s best to measure your finger in the late afternoon or evening when your fingers are naturally more swollen. This ensures that the ring will fit comfortably even when your finger size is smaller. Remember, a slightly looser fit is generally preferable to a ring that’s too tight.
If you have significant swelling in your fingers due to medical conditions, consult a jeweler for professional sizing.
Last Recap
So, there you have it! From string and paper tricks to dedicated ring sizers, you’re now equipped with the knowledge to measure your ring size accurately at home. Remember, precision is key, and taking your time will ensure a perfect fit. Whether you’re buying for yourself or someone else, the confidence that comes from knowing your exact size is priceless.
Happy ring shopping (or gifting!), and may your fingers always be adorned with perfectly fitting jewelry!
Answers to Common Questions
What if my fingers swell throughout the day?
Measure your finger in the late afternoon or evening when it’s likely to be at its largest size. This will help ensure your ring isn’t too tight.
Can I use a digital caliper to measure my ring size?
Yes! A digital caliper can provide very precise measurements, making it a great option for accuracy. Just remember to measure the inner diameter of the ring.
How do I convert my ring size measurement to a different sizing chart?
Different countries and brands use slightly different sizing charts. You’ll often find conversion charts online if you need to switch between systems. Look up the specific chart for the brand you’re purchasing from.
My measurements are slightly inconsistent. What should I do?
If your measurements vary slightly, choose the larger size to ensure a comfortable fit. A slightly larger ring is always preferable to one that’s too tight.