Repairing broken jewelry clasps at home can seem daunting, but with a little know-how and the right tools, you can breathe new life into your favorite pieces. This guide walks you through identifying different clasp types (like lobster, spring ring, and toggle clasps), assessing the damage, and then tackling the repair itself. We’ll cover everything from basic fixes to more involved techniques, helping you decide whether a DIY approach is right for you or if it’s time to call in a pro.
We’ll explore the common ways clasps break – bent springs, broken catches, you name it – and show you how to diagnose the problem. Then, we’ll equip you with a list of essential tools and materials, guiding you through step-by-step repair procedures for various clasp malfunctions. Plus, we’ll offer tips on preventing future breakages and when it’s best to leave the repair to a professional jeweler.
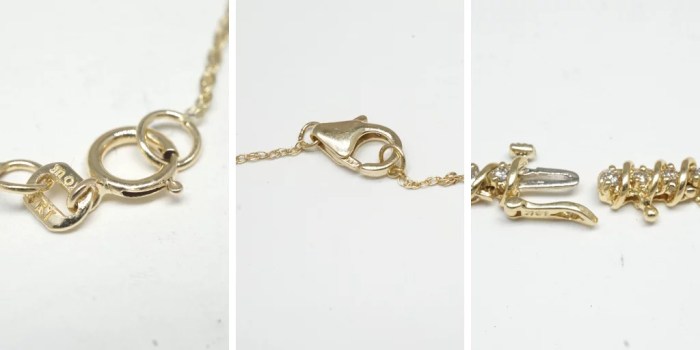
Identifying the Clasp Type
Before you can repair a broken jewelry clasp, you need to identify exactly what type of clasp you’re dealing with. Different clasps have different mechanisms and require different repair techniques. Misidentifying the clasp can lead to frustration and potentially further damage. Knowing the type will streamline the repair process significantly.Knowing the type of clasp is crucial for successful repair.
The repair process varies dramatically depending on the clasp’s construction and mechanism. A simple spring ring repair is far different from fixing a complex lobster claw clasp. Accurate identification is the first, and most important, step.
Common Jewelry Clasp Types
The following table details common jewelry clasp types, their descriptions, simplified visual representations, and a general assessment of repair difficulty. Remember, actual repair difficulty can vary based on the specific materials and the extent of the damage.
| Clasp Type | Description | Diagram (Descriptive) | Repair Difficulty |
|---|---|---|---|
| Lobster Clasp | This is a popular and secure clasp featuring a small, hinged claw that snaps shut over a ring. It usually has a trigger or push-button mechanism for opening. | Imagine a small claw, like a miniature lobster claw, attached to a ring. The claw has a spring-loaded mechanism and a small trigger or button to release the claw from the ring. | Moderate. Requires careful manipulation of small parts. |
| Spring Ring Clasp | A simple and common clasp consisting of a circular ring that springs open and closed. It usually has a small gap for insertion and removal. | Visualize a simple metal circle with a small, spring-loaded gap. The ring opens slightly when pressed, allowing insertion and removal of a connecting piece. | Easy. Often involves simple bending or reshaping. |
| Toggle Clasp | This clasp has a bar (the “toggle”) that passes through a loop or ring. The bar typically has a small hole or groove to prevent it from slipping out. | Picture a small bar with a hole or indentation at one end. This bar slides through a loop or ring on the other piece of jewelry. | Easy to Moderate. Repair usually involves tightening the loop or replacing the toggle bar. |
| Box Clasp | A more secure clasp consisting of a box-like structure with a hinged lid that snaps shut. Often found on necklaces or bracelets. | Imagine a small, rectangular box with a hinged lid that closes securely. The lid usually has a small catch or snap mechanism. | Moderate to Difficult. Requires careful alignment and often involves small, intricate parts. |
Repair Technique Variations Based on Clasp Type
The repair techniques vary considerably depending on the clasp type. Spring ring clasps, for instance, often only need a slight adjustment to regain their springiness, while a broken lobster clasp might require replacing a tiny pin or reshaping a bent component. Toggle clasps may simply need a tighter loop or a replacement bar. Box clasps, with their more complex mechanisms, present the most challenging repairs, often needing specialized tools or even professional assistance.
The materials used (e.g., delicate gold versus sturdy stainless steel) will also influence the repair approach.
Assessing the Damage
Okay, so you’ve identified your clasp type. Now, let’s get down to the nitty-gritty: figuring out exactly what’s wrong with it. Understanding the damage is key to a successful repair. A little detective work goes a long way here.Jewelry clasps fail in a few common ways, and recognizing the pattern of the breakage will guide your repair strategy.
Think of it like diagnosing a car problem – you wouldn’t just throw parts at it, right?
Common Clasp Breakage Patterns
Common ways jewelry clasps break include bent or broken spring mechanisms, a broken catch (the part that secures the clasp), or simply worn-out parts due to repeated use. Bent springs are often the result of accidental impacts or forceful closure. Broken catches can be caused by similar impacts or simply material fatigue over time. Worn-out parts, especially in cheaper jewelry, show themselves as loose fits or difficulty in closing the clasp.
For example, a lobster clasp might have a worn-out spring that makes it hard to close securely, or a box clasp’s catch might be worn down, leading to an insecure closure.
Identifying the Point of Failure
Carefully examine the clasp under good lighting. Use a magnifying glass if needed. Look for obvious signs of damage: bends, breaks, cracks, or excessive wear. Try gently manipulating the clasp to see where it’s sticking or moving incorrectly. Is the spring bent out of shape?
Does the catch not engage properly? Is there excessive play or looseness in the mechanism? Take your time; a thorough examination will save you headaches later. For instance, a broken spring in a lobster clasp will be immediately apparent as the claw won’t close. A loose catch in a toggle clasp will allow the toggle to slide freely without securing.
Diagnosing a Broken Clasp: A Flowchart
A systematic approach makes diagnosing the problem easier. Here’s a simple flowchart to guide you:[Imagine a flowchart here. The flowchart would begin with a box labeled “Examine the Clasp.” Arrows would lead from this box to three other boxes: “Spring Broken/Bent?”, “Catch Broken/Worn?”, and “Other Issues (e.g., Loose Parts)?”. Each of these boxes would then have arrows leading to boxes suggesting appropriate repair actions, such as “Repair/Replace Spring,” “Repair/Replace Catch,” and “Tighten/Replace Parts.” The final box would be “Repair Complete.”]The flowchart visualizes the decision-making process.
By following the steps systematically, you can quickly pinpoint the problem and choose the right course of action.
Gathering Necessary Tools and Materials
Successfully repairing a broken jewelry clasp at home requires the right tools and materials. Having everything prepared beforehand will make the process smoother and less frustrating. The specific tools and materials you need will depend on the type of clasp and the nature of the damage, but this section Artikels a general toolkit for most common repairs.Proper tools are crucial for a clean, precise repair.
Using the wrong tools can damage the jewelry further, leading to a more expensive professional repair or even irreparable damage. Choosing the correct adhesive or solder is equally important to ensure a strong and lasting bond.
Essential Tools for Jewelry Repair
The basic tools for jewelry repair are surprisingly accessible. Many can be found at craft stores or even in a well-equipped home toolbox. Even if you’re only tackling a single repair, having these on hand is worthwhile.
- Tweezers: Essential for handling small parts and delicate components without leaving fingerprints or damaging the metal.
- Needle-nose pliers: Offer precise gripping power for manipulating small clasps and components. Choose a pair with smooth jaws to avoid scratching the metal.
- Flat-nose pliers: Useful for bending and shaping wire, especially when working with jump rings or other small metal parts.
- Small screwdriver (jeweler’s screwdriver): Some clasps use tiny screws; a jeweler’s screwdriver set will have the appropriate size.
- Magnifying glass or jeweler’s loupe: Essential for close inspection of the damage and for working with tiny parts.
- Small hammer (optional): Helpful for gently tapping metal components into place.
- Cutting pliers (optional): Useful for removing damaged parts or trimming excess wire.
Suitable Adhesives and Soldering Materials
The choice of adhesive or solder depends heavily on the metal type of your jewelry. Using the wrong material can lead to a weak repair or discoloration.
- Gold and Silver: For precious metals like gold and silver, consider using a specialized jewelry solder designed for the specific karat of gold or the type of silver (sterling, etc.). This ensures a strong, lasting bond and minimizes the risk of discoloration or damage to the metal.
- Base Metals: For base metals (such as brass, copper, or nickel), epoxy adhesives designed for metal are a viable option. Ensure the adhesive is strong enough to withstand daily wear and tear. Soldering is also possible, but requires more skill and the appropriate solder for the base metal.
Remember to always test any adhesive or solder on a scrap piece of similar metal before applying it to your jewelry.
Alternative Clasp Components
Sometimes, replacing a damaged component is easier than attempting a repair. Fortunately, there are many readily available alternatives.
- Jump rings: These small, circular rings are widely used in jewelry making and can be used to replace damaged jump rings or connect different parts of a clasp.
- Clasp findings: Craft stores and online retailers offer a wide variety of clasp findings, allowing you to replace an entire broken clasp with a new one of similar style.
- Wire: For simple repairs, you can use thin wire of the same or a similar metal to create a temporary or even permanent fix. This is particularly useful for small repairs on delicate clasps.
Repair Techniques
Repairing a broken jewelry clasp can seem daunting, but with the right tools and a little patience, many common issues are easily fixable at home. This section details techniques for addressing bent springs, broken catches, and loose hinges, along with methods for strengthening weakened clasps. Remember, always prioritize safety and work in a well-lit area with adequate magnification.
Bent Springs
Bent springs are a frequent problem, especially in lobster clasps and spring-ring clasps. Gently coaxing the spring back into its proper shape is often sufficient.
| Repair Type | Tools Needed | Step-by-Step Procedure | Precautions |
|---|---|---|---|
| Straightening a Bent Spring (Lobster Clasp) | Tweezers, small flat-head screwdriver (optional) | 1. Carefully examine the bent spring to determine the direction and extent of the bend. 2. Using tweezers, gently apply pressure to the bent portion, slowly guiding it back into its original shape. A small flat-head screwdriver can provide additional leverage if needed, but use extreme caution to avoid scratching the metal. 3. Test the clasp repeatedly to ensure the spring functions smoothly and securely. |
Avoid applying excessive force, which could break the spring. Work slowly and methodically. Use a magnifying glass for better visibility of small components. |
| Straightening a Bent Spring (Spring Ring Clasp) | Needle-nose pliers, small flat surface | 1. Place the spring ring on a flat, stable surface. 2. Using needle-nose pliers, gently grasp the bent section of the spring. 3. Apply firm but gentle pressure to carefully reshape the spring to its original form. Avoid bending the ring itself. 4. Test the clasp to ensure it closes securely. |
Avoid applying too much pressure, which can permanently deform or break the spring. Work slowly and carefully to prevent damage. |
Broken Catches
A broken catch renders a clasp unusable. Repairing this depends on the type of catch and the nature of the break. Sometimes, a simple solder repair is possible, but this requires experience with soldering techniques and equipment.
| Repair Type | Tools Needed | Step-by-Step Procedure | Precautions |
|---|---|---|---|
| Replacing a Simple Catch | Small pliers, replacement catch (if available) | 1. Carefully remove any remaining broken pieces of the catch. 2. If a replacement catch is available, use small pliers to carefully attach the new catch to the clasp, ensuring a secure and even fit. 3. Test the clasp to ensure proper functionality. |
Ensure the replacement catch is compatible with the clasp. Avoid using excessive force when attaching the new catch. |
Loose Hinges
Loose hinges are a common problem in many clasp styles. These can often be tightened with minimal effort.
| Repair Type | Tools Needed | Step-by-Step Procedure | Precautions |
|---|---|---|---|
| Tightening Loose Hinges | Small pliers, possibly a tiny hammer (for very stubborn hinges) | 1. Gently squeeze the hinge using small pliers. Apply even pressure to both sides of the hinge. 2. Test the clasp to ensure the hinge is secure and the clasp closes smoothly. If the hinge remains loose, you may need to carefully tap the hinge pins with a tiny hammer while holding the clasp firmly. |
Avoid over-tightening the hinge, which could damage the clasp. Use a magnifying glass to ensure even pressure. |
Strengthening Weakened Clasps
Over time, clasps can weaken, making them less secure. While complete replacement is ideal, strengthening techniques can provide a temporary fix or extend the clasp’s lifespan. One method is applying a small amount of jewelry adhesive to reinforce the connection between clasp components. This is suitable for minor weaknesses. However, this is only a temporary fix and professional repair or replacement is recommended for long-term durability.
Preventing Future Breakage
Keeping your jewelry looking its best and avoiding those frustrating clasp malfunctions requires a little TLC. Proper care and understanding your clasp’s limitations are key to extending its lifespan and preventing future breakages. This section will cover practical tips for both caring for your jewelry and selecting more durable clasps.Proper jewelry care significantly impacts the longevity of your pieces, especially the delicate clasps.
Exposure to harsh chemicals, improper storage, and even daily wear and tear can all contribute to weakening and eventual breakage. Reinforcing clasps, while sometimes possible, isn’t always a foolproof solution; selecting a durable clasp from the start is the best preventative measure.
Jewelry Care to Prevent Clasp Breakage
Protecting your jewelry from the elements and accidental damage is crucial. Harsh chemicals found in cleaning products, perfumes, and even chlorine in swimming pools can corrode metal clasps, making them brittle and prone to snapping. Similarly, storing jewelry carelessly – tangled in a drawer or exposed to extreme temperatures – can lead to bending, scratching, and ultimately, breakage.
Reinforcing Clasps
While you can’t magically strengthen a weakened clasp, there are some things you can do to provide a little extra support. For example, if a clasp feels loose, you might consider adding a small amount of jewelry adhesive to secure any loose components, but only if you are comfortable doing so and have the appropriate adhesive. Be cautious, as too much adhesive can make the clasp stiff and difficult to use.
It’s also important to ensure the adhesive is compatible with the metal of your clasp to avoid any chemical reactions. Another option, if you’re comfortable with jewelry repair, is to use a tiny amount of epoxy to reinforce the clasp’s connection points. Remember, this should be a last resort, and always test the adhesive or epoxy on a hidden area of the jewelry first.
Choosing Durable and Reliable Clasps
Selecting a robust clasp from the beginning is your best defense against breakage. Consider these factors when choosing a new clasp or purchasing new jewelry:
- Material: Sterling silver and gold are generally more durable than cheaper metal alloys. However, even precious metals can wear down over time. Consider the karat for gold clasps; higher karat gold is softer but more resistant to corrosion.
- Clasp Type: Lobster clasps are known for their secure and relatively durable design. Box clasps, while elegant, can be more prone to wear and tear if not properly closed.
- Construction: Look for clasps with solid construction and securely soldered components. Avoid clasps with thin, flimsy parts that look like they might bend or break easily.
- Size and Weight: Choose a clasp that is appropriately sized for the weight and thickness of your jewelry. A small clasp on a heavy necklace is more likely to fail.
When to Seek Professional Help: Repairing Broken Jewelry Clasps At Home
Attempting a DIY jewelry repair can be a fun and rewarding experience, but sometimes, it’s best to leave the job to the experts. Knowing when to call in a professional can save you time, frustration, and potentially, even more damage to your cherished piece.There are several scenarios where professional help is not just advisable, but necessary. Attempting a home repair in these situations could result in irreparable damage or even injury.
Situations Requiring Professional Jewelry Repair
Professional jewelers possess specialized tools, expertise, and experience that often surpass what’s available to the average person at home. This expertise is particularly crucial when dealing with intricate designs, delicate materials, or significant damage. For instance, a clasp repair on a vintage diamond necklace requires a level of precision and understanding of antique jewelry construction that most home repair kits simply cannot provide.
Benefits of Professional Jewelry Repair, Repairing broken jewelry clasps at home
The advantages of using a professional jeweler extend beyond just a successful repair. Professionals guarantee quality workmanship, utilizing specialized equipment and techniques to ensure a long-lasting fix. They can also assess the overall condition of your jewelry, identifying potential future problems and offering preventative maintenance advice. Furthermore, reputable jewelers often provide insurance or warranties on their work, offering peace of mind.
A professional repair often adds value to your piece, preserving its aesthetic and monetary worth.
Selecting a Reputable Jeweler
Choosing the right jeweler is as important as deciding to seek professional help. Look for jewelers with established reputations, positive online reviews, and certifications from relevant professional organizations. Check if they offer insurance or warranties on their repairs. Don’t hesitate to ask about their experience with similar repairs and request a detailed estimate before proceeding. Inquire about the materials they use for repairs, ensuring they match the original quality of your jewelry.
A consultation visit allows you to assess their expertise and professionalism before entrusting them with your valuable piece. Consider visiting several jewelers to compare their services and pricing before making a decision. For example, a local jeweler with decades of experience and glowing customer testimonials is a much safer bet than an online repair service with limited information and reviews.
Conclusive Thoughts
So, whether you’re facing a slightly bent spring or a completely shattered clasp, this guide empowers you to tackle those jewelry repairs with confidence. Remember, a little patience and the right tools can save you money and keep your cherished pieces sparkling. From identifying the clasp type to choosing the appropriate repair technique, we’ve covered it all. Now go forth and fix those broken clasps!
FAQ Compilation
Can I use super glue to fix a broken clasp?
Super glue might work for a temporary fix on some minor breaks, but it’s not a durable solution for most jewelry repairs. It can also yellow over time and weaken the metal.
What if I don’t have the right tools?
Many repairs can be done with basic household tools, like tweezers and small pliers. However, for more intricate repairs, specialized tools might be necessary. Consider borrowing from a friend or purchasing inexpensive sets online.
How do I know if my clasp is beyond repair?
If the clasp is severely bent, broken in multiple places, or missing major components, it’s probably better to replace it rather than attempt a repair. Significant damage can also compromise the jewelry’s structural integrity.
Where can I find replacement clasps?
You can find replacement clasps at craft stores, online retailers specializing in jewelry-making supplies, or even some local jewelry repair shops.